I. Introduction
Hello and welcome to the Slider.js documentation! I did my best to make it as detailed as possible and leave you without any question about the framework, so you can start using it immediately. Do not be intimidated by the volume of this documentation, the learning curve is really smooth, I promise. So...
What are we going to cover?
First of all, we will install the framework. As trivial as it sounds, I figured it won’t hurt if I mention it.
Then we will start simple. We’ll build a very simple slider to get you familiar with Slider.js, we’ll examine the HTML and JS and understand some basic concepts of how the framework works. After that, in the “Under the hood” section we will dig deep into Slider.js and find out how it really works, we’ll discuss it’s logic and more.
In the “Hooks” and “API” sections you will find out how to use the framework to it’s full potential, and learn about all the information it provides you through the API. In the eight Chapter we will pay attention to one specific case - using multiple sliders on a single page, and how Slider.js helps us deal with it. In the last three Chapters you will find useful resources that you can use like video tutorials, examples and a quick reference for all hooks and interfaces.
One thing to note: we will not be going through the css code involved in making a slider, it’s assumed that you have some knowledge about it, since you are reading this.
II. Installation
As I mentioned earlier, it’s not much of an installation, but I felt I needed to include it in the doc anyway.
Just copy slider.js in your scripts folder and include it in your page, just after jQuery:
III. Getting Started
Enough words, let’s see Slider.js in action. We are going to build a really simple slider in this Chapter and I’ll introduce you to the basic workflow of using this framework. It might be confusing at first, but I promise you it will make sense in the next Chapters.
The HTML
Let’s throw it some HTML for a start. As I said, we’ll keep it simple for now:
<div class="sliderjs-slide"><img src="img/slider1/01.png"></div>
<div class="sliderjs-slide"><img src="img/slider1/02.png"></div>
<div class="sliderjs-slide"><img src="img/slider1/03.png"></div>
<div class="sliderjs-slide"><img src="img/slider1/04.png"></div>
</div>
Pay attention to the classes - they need to have those names if you want to avoid redefining class names (more on that in Chapter 8. We have a wrapper and four slides in it. As simple as it gets. As for the CSS, I believe you can figure it out (hint: slides are absolutely positioned at 0,0).
That’s all there is to the HTML.
The JavaScript
Now, the JavaScript. First of all, what do we want our slider to do? We want every 3 seconds the next slide to fade in. Here we go:
slider.sliderjs_event('transition_in', my_transition_effect);
slider.sliderjs_event('view_init', initial_settings);
slider.init({ interval : 3000, transition_length : 500 });
function initial_settings() {
this.z_move_to_top(this.current_slide_index);
}
function my_transition_effect() {
this.z_move_to_top(this.current_slide_index);
this.current_slide.hide().fadeIn(500);
}
And that is all. 10-15 lines of code is all we need to make this slider work.
Now let’s go through each step and see what we did and why:
Not much to explain here, you are making a new object, named “slider” which will be the reference to the actual slider. You will need that object in order to use hooks, redefine classes, etc.
slider.sliderjs_event('view_init', initial_settings);
In the first line we are basically saying: for the slider named slider, when the event show_slide occurs, call the function my_transition_effect. That’s how you hook in the slider’s functionality, and that’s an example of where you’ll need that object named “slider” that you made earlier.
There are many hooks available, for example transition_complete, which fires when, well, the transition completes. See Chapter 6 for all hooks that are available.
In the second line we are hooking to the view_init event and we are calling the function initial_settings when it occurs.
Next, we are firing up the slider:
Only after this line it will actually start ticking. We are calling the method init on our slider object and as arguments we are passing the interval for changing the slides and how long the transition takes, in milliseconds. We need to specify the length of the transition if we want to avoid that annoying animation stacking, or queueing. There is a built-in mechanism in the framework that prevents that, but we need to tell it how long each transition lasts.
Finally, we are defining the two functions “initial_settings” and “my_transition_effect”:
this.z_move_to_top(this.current_slide_index);
}
function my_transition_effect() {
this.z_move_to_top(this.current_slide_index);
this.current_slide.hide().fadeIn(500);
}
Here we are using the API that the framework provides in order to access useful information about the current state of the slider, and we are also using a method, provided by the framework.
When you are inside a hook function, you have access to the this object, which gives you the API. For example, we are calling the z_move_to_top method, which takes an index as an argument and moves the slider with that index on top of all slides, by using the “z-index” style. We get the index of the currently active slide with this.current_slide_index and pass it on to the method.
We will talk more about the z_move_to_top method later, it does so much more that it seems. More of that in Chapter 7.
In the second function my_transition_effect we are telling the slider to put the currently active slide on top (we need to do that on each transition in order to see the new slide) and we are referencing the element itself to do some basic jQuery animations: we hide it and then fade it in. Nothing fancy (yet). The important note here: when the transition occurs, the current_slide is now the slide that is supposed to transition in.
One more thing that the API provides - a reference to some key slides like - current, “breadcrum”, next, previous, first, last. We’ll talk about these in Chapter 7.
Conclusion
I really hope you got a basic idea of how much work Slider.js actually saves you. In the next couple of Chapters we’ll find out more about what components Slider.js can work with and we’ll dig deep to see how it... ticks. I highly recommend you read it carefully, as it will give you a better idea of the power of this framework. Moving on...
IV. Components of a Slider
Components? You know, next/prev arrows, ticker, etc. Here is a nice illustration of pretty much everything that Slider.js understands, as of version 1.0:
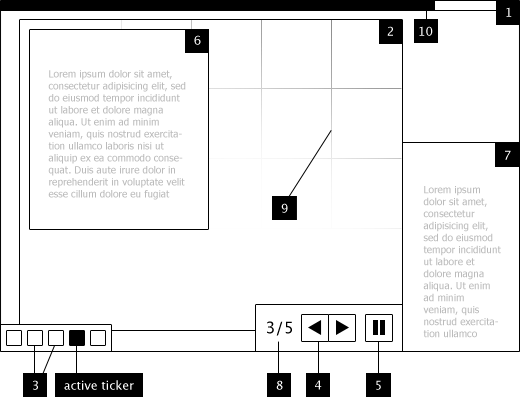
1. Wrapper
Not much to explain here, it’s just the main element that holds everything in the slider.
Usage:
// everything in the slider goes here, including slides, tickers, etc.
</div>
2. Slide
By “slides” Slider.js understands the elements that will cycle. You can put whatever content you want in that element - image, text, video, doesn’t matter.
Usage:
3. Ticker
That’s an interesting one. In it’s most basic form, it has a number of elements inside, one for each slide, and one of those elements has a class, indicating that the corresponding slide is the currently active one. It’s a simple, but powerful concept and you can use it in many ways. Please refer to the demo page to see it used in a few different ways.
Usage:
<div class=”sliderjs-ticker sliderjs-active-ticker”></div>
<div class=”sliderjs-ticker”></div>
<div class=”sliderjs-ticker”></div>
<div class=”sliderjs-ticker”></div>
</div>
NOTE: Make sure that the number of tickers is the same as the number of slides!
4. Next/Prev arrows
Easy one. When you click “next”, the next slides transitions in. I assume I don’t have to explain what “prev” does.
Usage:
<div class=”sliderjs-arrow-prev sliderjs-arrow”></div>
5. Play/Pause button
Pressing it once will stop the slider in it’s current state. Pressing it again will fire it up again.
Usage:
6. Inner content
That’s a little bit specific element. It’s useful in the situation where you have one element inside the slide, which you have to animate or do things with. It’s just there for a bit of conveniece if you happen to have that scenario.
Usage:
<div class=”sliderjs-inner-content-box”>
</div>
NOTE: The inner content box must be inside the main element of the slide!
7. Outer content
An “outer content” is an element, linked to a specific slide. For example: a piece of text, relevant to the contents of the slide. Because the “outer content” sits outside of the slide, it can be animated separately, which is very useful and adds many possibilities.
There’s a slider utilizing this component in the Demo page. Please check it, you’ll get a better idea of what it does.
Usage:
8. Pagination
Simple one. Shows the index of the current slide and the total number of slides.
Usage:
<div class=”sliderjs-current-slide”></div>
<div class=”sliderjs-last-slide”></div>
</div>
9. Grid
The grid is probably one of the most powerful features of this framework, and it saves you loads of work and hair pulling in order to make it work. A couple parameters (rows and columns) when you initialize the plugin and there you go - every slide is sliced up in a grid.
From there on, a simple loop through every piece of the grid will give you a beatifully animated transition and it’s ridiculously easy to pull off, thanks to Slider.js.
Usage: see Chapter 7!
10. Loader
This could be a loading bar, a circle, you decide. You can read more about how to utilize the loader in the next Chapter, where I explain in detail how it works.
Usage:
Conclusion
That’s all, as you can see it’s a simple but solid concept, used by many, if not all sliders out there. In Chapter 5 I will explain in detail how each component is used in the framework in order to make the slider work.
V. Under the Hood
Moving on, let’s actually find out more about the framework’s logic. In the following illustration you will see a generalized version of what actually happens while the slider is working. I haven’t included every single function, only the hooks that you can ... hook up to. In the next Chapter we’ll learn how to use the hooks, for now we’ll just talk about when to use them. Let’s have a look:
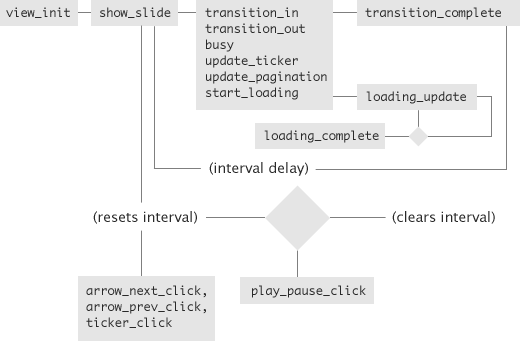
In Chapter 3 we used two of those hooks - view_init and transition_in and now you know where they are in the event chain. Now is the time to say, that some of those hooks are pure abstractions and it doesn’t matter too much if you use transition_in or show_slide to animate the currently active slide. It doesn’t matter in terms of functionality, but it will just look cleaner and the code will be easier to read and will make more sense.
For example, if you have a ticker and you want to do something cool with it whenever it updates, you’d want to put that code in the update_ticker hook. You get the idea.
The illustration pretty much explains it all, but let me say a few words about it as well.
The cycle starts with view_init, which is called only once, when you initialize the slider, like we did in Chapter 3 with the method init(). That’s the place where you’d want to make the initial setup, like we did. In our example we only wanted to put the first slide (in view_init that’s this.current_slide) on top, so it gets shown first when the slider fires up.
Before view_init gets called, the controller (yes, I coded everything using the MVC model) has already set up the main interval, so show_slide eventually gets called, which calls a series of functions. I already explained why it’s not only a single function, but anyway, here’s what code you’d want to put in each hook:
transition_in : code dealing with how the next slide appears;
transition_out : code dealing with how the current slide disappears;
busy : that’s an interesting one. It takes the transition_length parameter (you set that parameter when you initialize the slider) and it “locks” the slider, so it won’t accept any commands, until the transition completes. That’s done so we can avoid that nasty animation queueing or in some cases, braking the slider if we went all out on the animations.
The important thing to note about the busy hook is that when the “busy” state ends, it calls transition_complete. More on that below.
update_ticker : not much to explain here, put the code that deals with the ticker in this hook;
update_pagination : same as above;
start_loading, loading_update, loading_complete : put the code that handles the loading bar in start_loading, if you have it in your slider. That’s the place that you’d want to show the bar, or anything that deals with it’s initial setup. Similarly, put the code that you want to execute when the loading finishes in loading_complete.
This is the place to explain how the loader works. When it fires up, it will start calling loading_update and with each call it will pass you a number, starting from 0. When that number reaches 100, loading_complete gets called. The time it takes for that number to reach 100 depends on the transition_length parameter, which you specify when you initialize the slider.
transition_complete : gets called when the slider leaves the “busy” state. This hook is really useful, you can achieve really nice effects with it. For example in one of the sliders in the Demo page I made it so the outer contents update only after the new slide animates in. That’s only one use of it, of course you can do whatever you want with that hook, the possibilities are endless.
At this point the cycle waits for the main interval (the one that switches the slides) and then resets.
Now let’s talk about the user-triggered events:
arrow_next_click, arrow_prev_click, ticker_click : all three of those call show_slide when the event occurs, and tell it which slide to show, depending on the event.
Before show_slide gets called, the main interval is reset. For example, if the delay between switching slides is 3 seconds and the user clicks the “next” arrow after two seconds, the next slide appears immediately, and it will take 3 more seconds before the slide after that appears automatically.
play_pause_click : not much to explain here. When the user presses that button, the main interval is cleared. When the user presses it again, the interval is reset and the main loop starts all over again width the show_slide hook.
Conclusion
That’s pretty much it for this Chapter, I hope that now you have a good idea of how this framework works and you should be able to take full advantage of it’s functionality.
In the next two Chapters we will go into how to use the hooks and how to get access to tons of useful information, DOM element references and methods through the API that the framework provides.
VI. Hooks
In the last Chapter we learned about the different hooks available in the framework, now let’s see how to actually use them. I’m a big fan of learning through practice, so let’s consider an example.
You have a slider and you want to show additional information to the user when he presses the pause button. No problem, we’ll use the play_pause_click hook.
First of all, let’s define a function that will actually show the content. For the sake of simplicity, we are just going to call show() on an element which supposedly has the content that we want to show:
$(‘#content’).show();
}
Now we want this function to get called whenever the user presses the play/pause button. Here’s how you use hooks:
And in our case:
For the event name we used “play_pause_click”, and we are calling the function show_content when that event occurs. If you have developed plugins for WordPress, you will be immediately familiar with this workflow.
Following there’s a list of all hooks available. They are split in two categories, depending on the source of the event.
Triggered by the main cycle
show_slide
transition_in
transition_out
transition_complete
busy
update_tickers
update_pagination
start_loading
loading_complete
User-triggered
arrow_prev_click
ticker_click
play_pause_click
In the previous Chapter I explained when it’s appropriate to use each hook, if you need a refresher, here is the illustration again:
Conclusion
That’s pretty much everything you need to know to use the hooks properly. In the next Chapter, we’ll discuss the API - the stuff that you have access to from the functions that you attach to the hooks. It’s good stuff, don’t skip the next Chapter! :)
VII. API
Let’s consider the example from the previous Chapter:
$(‘#content’).show();
}
slider_object.sliderjs_event(“play_pause_click”, show_content);
We skipped one important thing there. We want the #content element to be shown only when the sliders is paused, not every time the user clicks the play/pause button. We can get the current state of the slider (if it’s playing or paused) through the API, like this:
And now we can modify out function to show the extra content only when the user has clicked pause:
if (!this.state_play) {
$(‘#content’).show();
}
}
Now to summarize, two important things to note:
1. this will point to the API only when you are inside a function that is attached to a hook with sliderjs_event().
2. The API that “this” points to is different in the user-triggered events! For more information to what you have access to in that case, please look at the list of all properties below.
List of all API properties and methods
id : the unique ID of the slider
current_slide : jQuery reference to the slide that is currently active. Have in mind, that in the transition_in hook for example, this will point to the slide that is supposed to appear!
next_slide : jQuery reference to the slide after the active one;
prev_slide : jQuery reference to the slide that sits before the active one. IMPORTANT: this does NOT point to the last active slide, but to the one that sits just before the currently active one
breadcrum_slide : jQuery reference to the last active slide. Example: if we are at slide 4 and the user clicks the ticker, pointing to slide 1, the current_slide property will point to 4, and breadcrum_slide will point to 1
first_slide : jQuery reference to the first slide
last_slide : jQuery reference to the last slide
slides : an array containing jQuery references to all slides
current_slide_index : the index of the currently active slide
next_slide_index : the index of the slide that’s supposed to come after the currently active one
prev_slide_index : the index of the slide that sits before the currently active one. NOT the same as breadcrum_slide!
breadcrum_slide_index : the index of the last active slide
first_slide_index : the index of the first slide
last_slide_index : the index of the last slide
grid_rows : two-dimentional array with jQuery references to all rows in the grid and their elements. For example, you would get the 8th grid piece from the 3rd row like this: grid_rows[3][8]
grid_cols : two-dimentional array with jQuery references to all columns in the grid and their elements. For example, you would get the 6th grid piece from the 2rd row like this: grid_rows[2][6]
rows : the total number of rows in the grid
cols : the total number of columns in the grid
inner_content_box : jQuery reference to the current slide’s inner content box.
inner_content_boxes : array with jQuery references to all slides’ inner content boxes
outer_content_box : jQuery reference to the element that holds the outer contents
outer_contents : array containing jQuery references to all slides’ outer contents
current_outer_content : jQuery reference to the element which has the current slide’s outer contents
next_outer_content : jQuery reference to the element which has the next slide’s outer contents
prev_outer_content : jQuery reference to the element which has the previous slide’s outer contents
breadcrum_outer_content : jQuery reference to the element which has the last active slide’s outer contents
first_outer_content : jQuery reference to the element which has the first slide’s outer contents
last_outer_content : jQuery reference to the element which has the last slide’s outer contents
active_ticker : jQuery reference to the currently active ticker element
prev_ticker : jQuery reference to the ticker element before the currently active one
next_ticker : jQuery reference to the ticker element after the currently active one
first_ticker : jQuery reference to the first ticker element
last_ticker : jQuery reference to the first ticker element
breadcrum_ticker : jQuery reference to the last active ticker element
loader_wrap : jQuery reference to the element which holds the loading bar (if it’s a bar at all)
pagination_current_slide : the number of the current slide
pagination_slides_count : the count of all slides
play_pause_button : jQuery reference to the play/pause button
arrow_next : jQuery reference to the “next” arrow
arrow_prev : jQuery reference to the “prev” arrow
state_play : the current play state of the slider. Either true or false
z_move_to_top : a method, which accepts a slide’s index as an argument and moves it on top of all slides.
List of API properties in the user-triggered hooks
event : the actual event object of the event.
state_play : the current play state of the slider. Either true or false
NOTE: I wasn’t really sure whether to include the properties related to the slides’ inner content, as they seem kind of useless to me, but I’ll leave them like this for now. It’s very possible that they get removed in future versions.
Important
I want to spend an extra minute to properly explain what’s the deal with that “breadcrum” property. In the following illustration you will see how Slider.js looks at the slides - which one is first, last, breadcrum and so on:
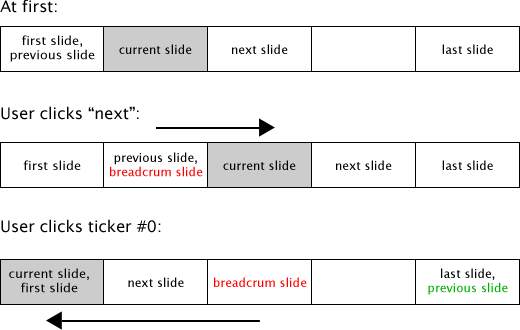
Please go through the illustration a couple of times, it’s really important that you understand it properly.
Conclusion
So now we know everything about the hooks and the API. We are almost good to go! There’s only one key element left - what if you want to have mroe than one slider on the same page? Or you want to use different class names? That will be the topic of the next Chapter, it will be a short one.
VIII. Custom Class Names
There are two cases where you’ll need to use custom class names:
- you want to have more than one slider on the same page;
- you want to use different class names.
That’s easily done with the define_class method, which is in the slider’s object.
Let’s consider a very simple example. You have a slider in the page, but for layout purposes you want the main wrapper’s class name to be different than sliderjs-wrap. You proceed like this:
Again, slider_object is the object that you created in the first line of JavaScript code in Chapter 3. You call it’s define_class method and you pass two arguments - the class identifier and the new class name. You can do this for every pre-defined class that Slider.js uses.
In our example, the identifier that we will need is slider_wrap:
Here is a list of all class identifiers and their defaults:
slide
arrow
arrow_next
arrow_prev
pagination
pagination_current
pagination_last
play_pause
loading_bar
progress_bar
ticker_wrap
ticker
active_ticker
inner_content_box
outer_content_box
outer_contents
sliderjs-slide
sliderjs-arrow
sliderjs-arrow-next
sliderjs-arrow-prev
sliderjs-pagination
sliderjs-current-slide
sliderjs-last-slide
sliderjs-play-pause
sliderjs-loading-bar
sliderjs-loading-bar-progress
sliderjs-ticker-wrap
sliderjs-ticker
sliderjs-active-ticker
sliderjs-inner-content-box
sliderjs-outer-content-box
outer-contents
Conclusion
Now you know how to use custom class names, and that pretty much concludes this documentation. In the next Chapter you’ll find out about the various learning resources that I’ve provided, like examples, a handy quick reference and video tutorials.
IX. Learning Resources
Video Tutorials
I have recorded four video tutorials for building every slider from the Demo page, step by step. If you are still confused about a certain feature, I suggest watching those!
Quick Reference
In the Quick Reference page you will find a list of all available hooks, API properties and pre-defined classes, with a short description. Really handy for... quick reference.
Examples
These are three sliders, taken from the Demo page and below every slider you will find it’s HTML and JavaScript code. Pay attention that the JavaScript code is less than the HTML!
Example 1:


<div class="sliderjs-slide"><img src="img/slider3/01.jpg"></div>
<div class="sliderjs-slide"><img src="img/slider3/02.jpg"></div>
<div class="sliderjs-slide"><img src="img/slider3/03.jpg"></div>
<div class="sliderjs-slide"><img src="img/slider3/04.jpg"></div>
<div class="sliderjs-slide"><img src="img/slider3/05.jpg"></div>
</div>
slider3.sliderjs_event('transition_in', slider3_transition_in);
slider3.sliderjs_event('view_init', slider3_view_init);
slider3.init({ interval : 3500, transition_length : 1000, rows : 1, cols : 12, grid : true });
function slider3_transition_in() {
this.z_move_to_top(this.current_slide_index);
this.current_slide.find('.sliderjs-slide-piece').css({ "top" : -240 });
var current_piece = $(this.current_slide).find('.sliderjs-slide-piece').first();
var the_interval = setInterval(function() {
current_piece.animate({ "top" : 0 }, { duration : 500, easing : "easeOutQuart" });
current_piece = current_piece.next();
if (current_piece.hasClass('sliderjs-piece-last')) {
clearInterval(the_interval);
}
}, 70);
}
function slider3_view_init() {
this.z_move_to_top(this.current_slide_index);
}
Example 2:


<div class="sliderjs-shadow"></div>
<div class="sliderjs-slides-wrap">
<div class="sliderjs-slide">
<img src="img/sliderjs/01.jpg">
<div class="sliderjs-inner-content">
<h1>Slider.js Demo</h1>
<p>Lorem Ipsum...</p>
</div>
</div>
<div class="sliderjs-slide">
<img src="img/sliderjs/01.jpg">
<div class="sliderjs-inner-content">
<h1>Slider.js Demo</h1>
<p>Lorem Ipsum...</p>
</div>
</div>
<div class="sliderjs-slide">
<img src="img/sliderjs/01.jpg">
<div class="sliderjs-inner-content">
<h1>Slider.js Demo</h1>
<p>Lorem Ipsum...</p>
</div>
</div>
<div class="sliderjs-arrow-next"></div>
<div class="sliderjs-arrow-prev"></div>
<div class="sliderjs-ticker-wrap">
<div class="sliderjs-ticker sliderjs-active-ticker"></div>
<div class="sliderjs-ticker"></div>
<div class="sliderjs-ticker"></div>
</div>
<div class="sliderjs-play-pause"></div>
</div>
slider5.sliderjs_event('view_init', slider5_view_init);
slider5.sliderjs_event('transition_in', slider5_transition_in);
slider5.init({ interval : 2000, transition_length : 800 });
function slider5_view_init() {
this.z_move_to_top(this.current_slide_index);
}
function slider5_transition_in() {
this.z_move_to_top(this.current_slide_index);
this.current_slide.css({ "left" : -470 }).animate({ "left" : 0 }, { duration : 800, easing : 'easeOutQuart' });
this.inner_content_box.css({ "left" : -500 }).animate({ "left" : 10 }, { duration : 800, easing : 'easeOutQuart' });
}
Example 3:


<div class="sliderjs-slide">
<img src="img/slider2/01.jpg">
</div>
<div class="sliderjs-slide">
<img src="img/slider2/02.jpg">
</div>
<div class="sliderjs-slide">
<img src="img/slider2/03.jpg">
</div>
<div class="sliderjs-slide">
<img src="img/slider2/04.jpg">
</div>
<div class="sliderjs-slide">
<img src="img/slider2/05.jpg">
</div>
<div class="sliderjs-slide">
<img src="img/slider2/06.jpg">
</div>
<div class="sliderjs-play"></div>
<div class="ticker2-wrap">
<div class="sliderjs-ticker">1</div>
<div class="sliderjs-ticker">2</div>
<div class="sliderjs-ticker">3</div>
<div class="sliderjs-ticker">4</div>
<div class="sliderjs-ticker">5</div>
<div class="sliderjs-ticker">6</div>
</div>
<div class="sliderjs-outer-content-box">
<div class="sliderjs-outer-contents">This is a demonstration...</div>
<div class="sliderjs-outer-contents">This box sits outside...</div>
<div class="sliderjs-outer-contents">... is animated in.</div>
<div class="sliderjs-outer-contents">Also, there are ...</div>
<div class="sliderjs-outer-contents">Here we are just...</div>
<div class="sliderjs-outer-contents">The example below shows...</div>
</div>
</div>
slider2.sliderjs_event('transition_in', slider2_transition_in);
slider2.sliderjs_event('transition_complete', slider2_transition_complete);
slider2.sliderjs_event('view_init', slider2_init);
slider2.init({ interval : 2500, transition_length : 500 });
function slider2_init() {
this.z_move_to_top(this.current_slide_index);
this.next_slide.css({ "left" : 470 });
this.outer_contents.hide();
this.current_outer_content.show();
}
function slider2_transition_in() {
this.z_move_to_top(this.current_slide_index);
this.current_slide.css({ "left" : 470 }).animate({ "left" : 0 });
this.breadcrum_slide.animate({ "left" : -150 });
}
function slider2_transition_complete() {
this.breadcrum_outer_content.animate({ "left" : -350 }, 500);
this.current_outer_content.show().css({ "left" : 350 }).animate({ "left" : 0 }, 500);
}